Sunday, December 23, 2012

Grandma's fruitcake bonbons


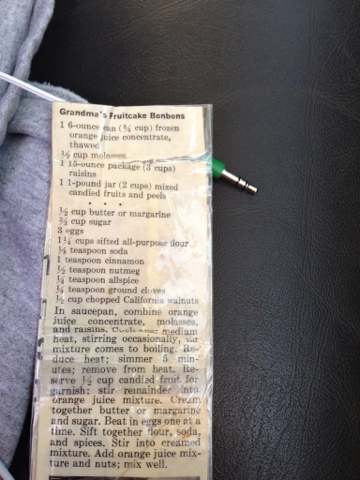
(Copy of Grandma Vera Bogler's recipe above, same recipe below.)


GRANDMA'S FRUITCAKE BONBONS Approximately 100 bonbons

1 can (6 ounces) frozen orange-juice concentrate

1/2 cup molasses

1 package (15 ounces) dark raisins

1 jar (1 pound) mixed candied fruit

1/2 cup butter softened

2/3 cup sugar

3 eggs

1 1/4 cups sifted flour

1 teaspoon ground cinnamon

1/2 teaspoon ground nutmeg

1/4 teaspoon ground allspice

1/4 teaspoon ground cloves

1/8 teaspoon baking soda

1/2 cup chopped walnuts

Petite paper candy cups

Candied cherries

1. In a saucepan, combine orange-juice concentrate, molasses and raisins. Cook over medium heat, stirring, until mixture boils. Reduce heat and simmer 5 minutes. Remove from heat and add candied fruit. Cool.

2. Cream butter and sugar; beat in eggs one at a time. Sift together flour, cinnamon, nutmeg, allspice, cloves and baking soda; add to sugar mixture. Stir in fruit mixture and nuts.

3. Place candy papers on a baking sheet; put 1 tablespoon batter into each paper. Bake in a preheated 350-degree oven for 10 minutes or until cakes test done. Transfer to cooling racks and garnish with a slice of candied cherry.

Note: The oven rack should be placed in the top half to third of the oven; watch carefully for burning.

Data per serving Calories 56 Protein 1g Fat 1g Carbohydrates 11g Sodium 18mg Saturated fat 0g Monounsaturated fat 1g Polyunsaturated fat 0g Cholesterol 6mg


Sunday, November 11, 2012

Log deer with plans.

Log deer completed. Several more to make. Plans hubby and son used to make these cute log deer are posted. Click on diagram pic to see full view of plans.

Friday, November 2, 2012

Good Housekeeping Rolls


Over the years I have tried other recipes, but this is our family's absolute favorite holiday rolls. These tender crescent shaped rolls are a staple of our holiday meals and we all agree that there is no point in looking for another basic roll recipe. The smell of them baking draws the family into the kitchen.


1/2 cup butter flavor Crisco shortening
2 teaspoons salt
3/4 cup sugar
1 teaspoon sugar
1/2 cup unsalted butter
4 tablespoons unsalted butter
2 packages active dry yeast
7-1/2 cups all-purpose flour
3 large eggs, at room temperature

EARLY IN DAY OR DAY AHEAD: In large bowl, combine shortening, salt, sugar, and 1/2 cup butter (1 stick). Cut the shortening and butter into several pieces to help facilitate melting. Pour 1 cup boiling water over mixture and stir until blended.
In small bowl, sprinkle yeast and 1 teaspoon sugar over 1/2 cup warm water (105 to 115 degrees F.); stir to mix slightly. Let rest 5 minutes.
To mixture in large bowl, add flour, eggs, yeast mixture, and 1 cup cold water, stirring to mix well. Dough will be sticky. Cover bowl with plastic wrap; refrigerate 5 hours or overnight, stirring down dough, if necessary. The dough is easy to work with after refrigeration.
ABOUT 1-1/2 HOURS BEFORE SERVING: In small saucepan over low heat, melt 4 tablespoons butter (1/2 stick). Remove dough from refrigerator; divide into 3 pieces. On floured surface, with floured rolling pin, roll 1 dough piece into 12-inch round. Brush lightly with some melted butter. Using a pizza cutter, cut dough round into 12 wedges. Starting at curved edge, roll up each wedge toward point; curve ends in slightly toward each other. Place rolls, point-side down, about 1 inch apart, on greased large cookie sheet. I put 12 on each cookie sheet. Repeat with remaining dough pieces, using a large cookie sheet for rolls from each piece. (If you don't have 3 cookie sheets, work with 2 pieces of dough at a time and keep remaining dough refrigerated.) Cover; let dough rise in warm place (80 to 85 degrees F.) until doubled, about 1 hour. If your kitchen is cool, preheat oven on warm for a minute or so and then turn off and put in barely warm oven to speed rising.
Preheat oven to 375 degrees F and bake rolls 15 to 20 minutes, until rolls are lightly brown. These rolls freeze beautifully in freezer zip lock bags. This dough is also excellent for homemade cinnamon rolls.

Sunday, April 3, 2011

Pottery barn teen finds for preteen.....

Updating our 10 year old son's bedroom. Cannot believe my baby, Eric, is really a preteen......


Here's a few fun additions that have met his approval....:)

A wall mural for my future Mizzou football lineman.....well Florida Gator would work too (for me....hehe).


A cool United States chalkboard wall light map......


Picture frames shaped like old Polaroid pictures to use in a unique way.....


Aren't these sweet?

Waiting on these to arrive, then will post pics of his new tween boy's room.

Oh and love this bed on caster wheels. I have a feeling hubs will be making one of these someday.....:)


Wednesday, March 30, 2011

No, not a Dora lamp

I have been searching and searching for a modern version of an antler lamp for weeks to finish off our foyer table. But I knew if I just held off long enough I could flea/gw something.......

Eventually......ummm, like today! .... I did........


No, not the Dora lamp, it is for my sweet Courtney, granddaughter, who is so in love with her now.

And there's that rather ugly antler lamp laying on the right. Pic taken with them in the back of the truck just after I had bought them. Don't mind the mud.

Both lamps combined, less than $5.....can you say ....yeah!!!!!!

After a bit of spray paint, and adding one of the shades from my personal private basement collection, this is how the lamp looked......


Love it. Total cost out of pocket.....2.49.


Also found these cool glass candle holders. Human backhoe...aka, hubby....think they look like a phallic symbol......men!...whatevah!


My ultimate weakness is always silver candlesticks......here's a few more for my collection.....:)


The backdrop in the foyer is our recently stenciled walls. Love this gray/blue paint color. It's Martha Stewart eggshell in Opal from home depot. This is my favorite color at this moment in time.

Here's the new look elevated on an old pepsi crate, that was already painted black when I found it.


Sweet simple foyer for our sweetwater cottage log home.


Sunday, March 27, 2011

kitchen decor compromise

We are soon to start really renovating our little log cottage kitchen. I love how the pioneer woman used one these to place in her kitchen redo a few years ago. These were also used in a hgtv dream home giveaway a few years ago. They are hand carved wood and available through urbanmaterials.com.


They are priced at $395. Not really too bad, but we have a lot of cash already committed to our little redo. Then I found this acrylic resin molded baby.....


$49 from zgallerie.com. A bit of a compromise, but should work for the overall feel of the planned kitchen. He will have a special place above the cooktop on the cabinetry mounted hood.


Here's an idea of how our kitchen hood will look, although we have hand-made pine cabinets. Our cabinets were built by my son's shop teacher at our high school. Actually our whole log cottage was built by him 20 years ago.

While checking out the deer head, found these adorable chocolate colored salad plates on sale for $1.99 each. Love the chocolate colored bunny plate, so I ordered 10.....:), as you can order individually and not as a set.


Soooooo ready to move on to our all out kitchen assault, now that the loft is done.

Tomorrow.....road trip to Stl to visit THE girls. Hoping to stop at a couple Homegoods to shop for new lamps in the entry foyer.

Log cottage loft remodel

I always hesitate in which order to post redos, remodels, etc. Do I post the final product, which makes everything look so easy and effortless? Or do I show the uglies and hard work first?

First off this has been an off and on remodel process over the last 15 months. When we bought our log cottage we knew we wanted to open up this hallway to make another living space.


But we knew we would have to sacrifice this atrocity.


An underused storage room, with absolutely no natural light. So dark and gloomy. We really do have plenty of storage in our log cottage.....bye, bye , good riddance.

Now this is a start in the right direction.....:)


Two walls gone and new load bearing header being made. Check it out on the sawhorse. Gotta love our teenage son's room Xmas decor in the background.

Header up, 2x4's gone. Really can get a feel for the space of the new loft area.


But still lots to do:
Scrape ugly swirly ceiling
Paint and stain
Built-ins under eaves
Insulation under eaves
Install hand whitewashed pine flooring
New light fixtures and wiring
Shop for decor appropriate to space, especially a long narrow sofa
Etc.

And a few months and tears later.....

Loft complete.....now that's a real ahhhhhhhh.......


Couple of baseboards to place and let the decorating begin.....


Bright , simple space where there used to be a wasted dark storage room. Sofa....goodwill purchase....perfect and $60. Did I say perfect?


Favorite find for room. Overstock.com rug. Love it!

Here's a few more sweet things.


Upstairs log cottage......complete.

Thanks hubs!
living the log home life...........
thanks for visiting.